![]()
![]()
![]()
In the configuration panel of the WinCC OA client projects settings regarding the connection between client and server are carried out/shown. It is not necessary that the OPC UA server is running during the connection configuration. The configuration panel of the WinCC OA OPC UA client is opened via the system management panel:
Figure: System management panel - "Driver" tab
Click on the OPC UA Client button in the Drivers tab.
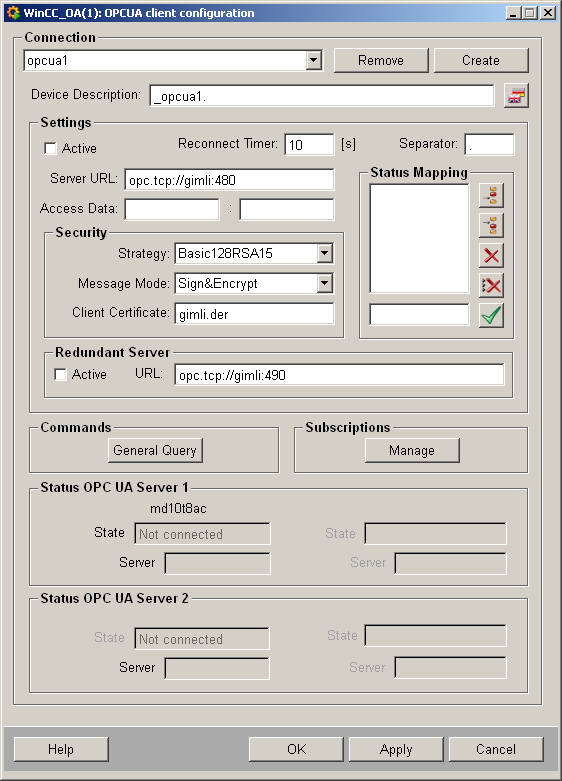
The following figure shows the panel for the configuration of the OPC UA connection between clients and server. The configuration of the server uses the corresponding internal data point of the type _OPCUAServer (see Internal data points of the OPC UA client).
Figure: Configuration panel for the WinCC OA OPC UA client
The OPC UA configuration panel allows the input/view of the following parameters:
Connection CreateClick on the Create button to specify a name for the connection and thus to create a new connection with basic settings. This opens an input dialog for entering the connection name - enter a name and confirm by clicking on OK. Click on Apply to create the connection data point _<connection_name> with the set parameters at the type _OPCUAServer (in a redundant project a data point with the name "_<connection name>_2" is created automatically for the redundant WinCC OA server) or on the OK button to create the connection data point with the set parameters and to close the configuration panel. Click on Cancel to close the configuration panel without the connection data point has being created (if not already done before). In order to change the configuration select the connection name in the combo box and make your changes. The parameter changes that regard the connection establishment will not be applied until the next connection establishment. That means that if a connection is already established, this has to be deactivated and then activated again (see description of Active check box below) - please mind that every configuration change has to be applied by clicking on the Apply button before it takes effect. RemoveClick on the Remove button to delete the selective connection (and thus also the connection data point or data points, respectively, in case of a redundant configuration). Note that the removing of a connection is not effective until the Apply button was not clicked. Device descriptionIn the Description text field a custom description for the created connection can be added (or changed) in the corresponding project language. The default description in every project language is "_<connection_name>" - this is shown after reopening the configuration panel.
Settings ActiveTick this check box to activate the connection to the OPC UA server. This setting is not effective until the Apply or OK button was not clicked. A created and configured connection can be deactivated at any time. Thereby the connection data point is not deleted and the connection can be reactivated anytime. The status display changed from Connected to Not connected if a connection has been deactivated. If a connection has been deactivated, the driver does not communicate with the corresponding OPC UA server anymore. This way it is, for example, possible to avoid alarms during maintenance operations have to be made on the OPC UA server. Reconnect TimerSpecify a time in seconds after expiration the driver tries to reconnect to the server in case of a connection breakdown. Connection establishment attempts are carried out only then, when no connection is available. By default the timer is set to 10 seconds. Server URLHere enter the URL to the server (TCP/IP address and port for the server to be communicated). Examples for the server URL address are: opc.tcp://localhost:4840 opc.tcp://host:51234/UA/UA_Server Access dataHere enter the access data for the server. The format for the input is <user_name>:<password>. The password is displayed encoded. If the input field is left empty, the client tries to connect with the user Anonymous (see also User Authentication). SeparatorHere enter the separator for the display of the display names (default = "."). With this the display names of the address space are separated when browsing. Status MappingHere enter the mapping of the OPC UA status codes to WinCC OA user bits (_online.._userbit1 to _online.._userbit32). With these entries it is possible to map status information of the OPC UA items to WinCC OA user bits. By standard this field is empty, i.e. the mapping to user bots does not take place. The entries have the following syntax per row: <UA status code><space><user bit number> Whereas one user bit on the right side can be present in several rows, e.g.: 0x00000000 1 0x80280000 2 0x80300000 2 2150891520 32
Security PolicyChoose a security policy - None or Basic128Rsa15. For further information see Security Policy. Message ConceptChoose a message security concept - None, Sign or Sign&Encrypt. If in the security policy None has been selected, the message security concept is automatically also None - then the selection of another message concept is not possible. If another security policy as None has been chosen, for the message security concept either Sign or Sign&Encrypt can be selected. For further information see Message Security Concept. Client certificateName of the client certificate which is accepted for the server. The certificate name has to be entered without path specification and file extension and is written to the _OPCUAServer.Config.Security.Certificate data point element of the server connection data point. If the field is empty, the client uses the default certificate, which is delivered by WinCC OA. See also Certificates.
Redundant Server ActiveTick this check box to set the connection to the redundant OPC UA server to active. Server URLHere enter the URL to the server (TCP/IP address and port for the server to be communicated). This address must be accessible. Examples for the server URL address are: opc.tcp://localhost:4840 opc.tcp://host:51234/UA/UA_Server
In addition to an accessible server URL also the link, which is returned by the server during Discovery, must be accessible (e.g. in case of several network cards).
Commands General QueryClick on the General Query button to trigger a general query (GQ) for all configured data values of the correspondent server. In the GQ a single-read request to data points with peripheral address to values is carried out. A general query can also be triggered automatically during connection establishment and/or during a redundancy switch-over (see autoGQ config entry; default = no automatic GQ). For further information see General Query (GQ).
Subscriptions ConfigureOpens the panel for configuration of a subscription (see Configuration of a Subscription). A subscription is always definitely assigned to a server. A server may have multiple subscriptions.
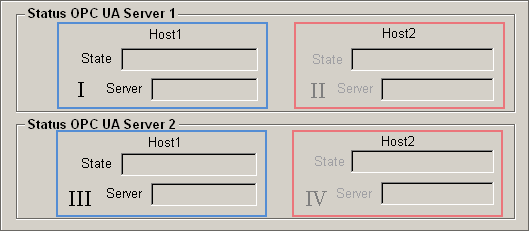
Status OPC UA Server 1/2 This area provides information about the states of the OPC UA server connections. If a redundant server is used, an area is available for each of the redundancy partners (OPC UA server 1 & OPC UA server 2). Figure: Status OPC IA Server 1/2
Status OPC UA Server 1I
II (only when using a redundant client)
Status OPC UA Server 2III
IV (only when using a redundant client)
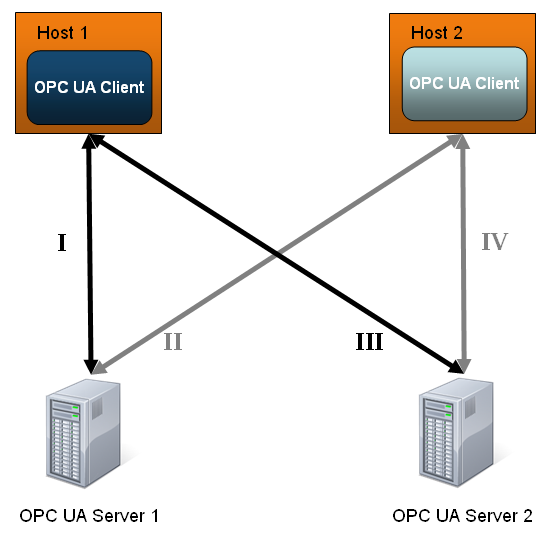
Figure: OPC UA Client - Connection Schema
|
![]()
V 3.11 SP1
Copyright ETM professional control GmbH 2013 All Rights Reserved