As
mentioned in the introduction, the master data point is the central
element in mass configuration. This page aims to provide essential
information on creating and configuring a master data point for
mass configuration. |
One or more data points are created in the database
of the WinCC OA
system on the basis of the master data point. All configuration
settings for the master data point are transferred to a new data
point when it is created. Subsequent changes to the master data
point are transferred automatically to data points at runtime.
If PowerConfigs containing dynamic attributes are added to the
master data point, then changing a dynamic attribute does not
result in this change being adopted by existing data points. Settings
for dynamic attributes must be made using PowerConfig
configuration at the data point. |
 Note Note
Before you can create a master data point or
data point at all, a data point type must be defined specifying
the structure and data types of the leaf elements. The chapter
PARA/Create a
data point type contains further information on creating a
data point type.
 Caution Caution
The renaming of a data point type or node in
the structure, with presence of a master data point, is not supported
by the Dp-Type-Editor. Since the name of the master data point
consists of the data point type name (see below), the mass configuration
would not work anymore in case of changing the type name! The
changing of the data point type structure (insert, delete node)
can be performed at any time. |
Once you have defined the structure of your
data point by creating a data point type, your next step can be
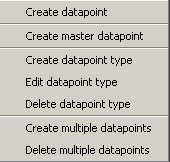
to add the master data point. To do this, right-click on a data
point type and select the option Create
master data point in the context menu that opens. |
The figure below shows the context menu: |
|
The name given to the master data point
is constructed as _mp_
+ data point type name.
A gray folder symbol with a red point on the left side below,
indicates a master data point in the PARA module.
Of course it is not an essential requirement
to create a master data point. After defining a data point type
you can create just one data point (see also Creating
a data point) or multiple data points (see also Creating
multiple data points). |
The major drawback in creating multiple data
points without an existing master data point is that changes are
not transferred to all the data points (apart from those made
at the data point type itself). Thus each data point would need
to be provided
with configs and configured individually. Another disadvantage
is that it is also not possible to work with PowerConfigs if there
is no master data point. By inserting a PowerConfig (for example,
alert handling with 3 ranges) at the data point element of the
master DP, the configured settings are transferred to all existing
data points (only dynamic attributes can be changed). If the master
data point is subsequently deleted, the "alert handling"
Config can then be changed in any way for each data point (ranges,
limits and alert classes can be configured to suit). When a new
master DP is created, this contains no alert-handling Config.
Re-inserting a PowerConfig for alert handling, and setting the
parameters in the master DP, once again transfers the settings
to all the DPs, so that the parameters changed previously on the
individual DPs are lost. The user must be aware of this process
and take care when deleting and creating a master data point in
order to avoid producing inconsistencies in the project. |
Caution
In order to guarantee that the mass configuration
works properly and that there are no inconsistencies in the system
the configs always have to be configured via the master data point.
Afterwards the data points can be created. If the master data
point is deleted or created when data points exist problems with
the mass configuration and the already existing configs may occur! |
Caution
When working with the mass configuration facility
in WinCC OA,
always use the functions/panels provided (Creating
multiple data points, Deleting
multiple data points, PowerConfig
configuration, Templates/DP
lists, Excel
tools). Avoid making changes using CTRL scripts you have written
yourself, external database tools, exporting and importing DP
lists in standard format using the ASCII Manager or the like,
as this can lead to inconsistent states in the system. |
Define the master data point for a data
point type and provide this with Configs (for more details of
the data point Config refer to PARA
Module/Data point configs, basics) and PowerConfigs (more
details in PowerConfigs, basics).
Configure these Configs to suit your requirements. If multiple
data points are created after configuration then these are derived
from the master data point and have the same settings. Any changes
to the master data point (for example, adding a Config, modifying
the values set in a Config etc.) have the same effect on all data
points of this type at runtime. |
The Transfer
to all DPEs option in the context menu of the master data
point (right-click on the master data point) updates all data
points with the configs and configurations set in the master data
point. The settings of the dynamic attributes in the data points
are retained after using this function. A confirmation prompt
appears before the transfer is made to all DPEs, however. Use
this function to maintain consistency in the system.
ATTENTION
The archive config is an exception. In case
of an archive config, the option "Transfer
to all DPEs" does not copy the settings of the archive
config on the master data point. If the archive config is set
inactive, the instances remain active.
|
The PARA module has been provided with new functions
for mass configuration (context menus, appearance of the tree
structure). You can change back to the "old mode" at
any time as follows:
Open the panel <wincc_oa_path>/panels/para.pnl
in GEDI. In the panel, click on the
ActiveX object in the tree view and switch to the Events tab. Open the Initialize script. There are 2 comment lines
in the middle of the script. Remove the two "//"
from the second comment line and click on OK in the Script Editor. Save the panel and restart
the PARA module.
The "old" PARA module is now available
again (in this case mass configuration can no longer be used).
It is necessary to change the PARA module if you have previously
already used master data points and then want to use the functions
of the earlier configuration module. |