ActiveX-Controls are autonomous
interface elements that were implemented independently
of the application in which they are used. Different vendors
offer Controls for different
tasks: from the 3D shaded button through realistic pointer devices
to whole trend displays or table calculations, this kind of objects
exist.
The advantage is that you can access a much bigger number of available elements
from the view of the creator as the producer provides - requirement
is merely that the used system can work as an ActiveX
container. The Windows user interface of WinCC OA is such a ActiveX
container. The interfaces
to such ActiveX control are structured similar to the WinCC OA own graphic object
in properties, methods and events.
Therefore, you can embed such controls
almost as easy as you can use WinCC OA
graphic objects. In order to get to know this application better,
you will add a slider
to the input dialog of the valve symbol to enter the opening level.
The slider will be added as external
ActiveX control.
Open
the panel .../objects_parts/GS_VALVE_dialog.pnl in the graphic editor. Select
the circle symbol
with the red "X"
from the object bar of the graphic editor and drag
subsequently a rectangle to the panel surface (see
figure below with the result). The selection dialog for the
selection of a specific activeX control
will be opened. The list comprises only the controls
that were registered in the operating system. Select
the control "GMS Linear Gauge ActiveX Control". Switch
to the extended
tab in the property window and navigate to the property
"Orientation".
Set these with the integrated combo box to the value "horizontal".
Adapt
the size to the exact existing free space if necessary (the
size should be approximately 110 x 27 pixels). Make
sure that the properties "ScaleMin" or "ScaleMax"
are set to 0 or 100 (these should be the
standard values).
Figure: Adding an ActiveX-Control
"Slider" to the Input
Dialog of the Valves
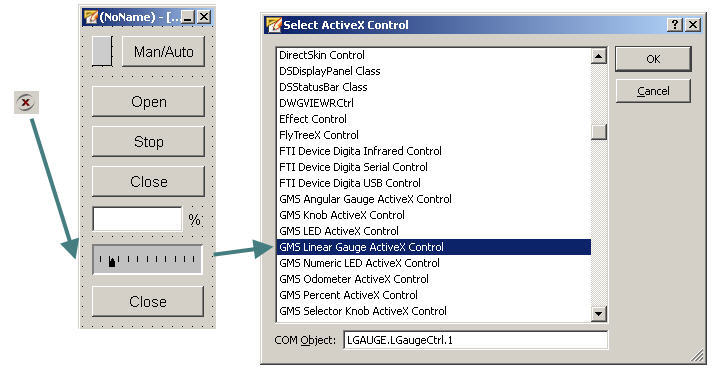
Figure: Display of the Properties
of the ActiveX-Control on the
left and ready Result in the Panel on the right

Now you have to determine the dynamic
properties of the ActiveX element - you will do this directly
with the Control
language:
The pointer arrow
of the control should always show the current value of the data
point element $valve+".cmd.position".
Furthermore, the object should be activated only when $valve+".state.manual"
is equal to TRUE. When
the slider will be moved using the mouse
(EventSlide), the value of the setting
will be shown in the text field
continuously. As soon as you release the mouse (EventChange),
the current value should be passed to the data point element $valve+".cmd.position". The following
3 EventScripts for the ActiveX-Control will be necessary for the
completion of this task:
 NOTE NOTE
The Initialize is only available when the standard
tab is selected in the attribute editor. EventChange and EventSlide
are only available when the extended tab is selected in the attribute
editor.
EventInitialize
main()
{
dpConnect("showPos",$valve+".cmd.position",
// Registration
for reference
$valve+".state.manual");// value as well as
manual mode
} // in each case with
$-Param.
showPos(string
dpe, float pos, string dpe2, bool man)
{
this.PointerValue
= pos; //
Current. reference value in 'pos' is passed to
// the property pointer
- percentage value
if(man)
{ // If manual mode is
activated,
// you can use the
object
this.Enabled
= true; // You can use the
object
}
else
this.Enabled
= false; // ...otherwise not enabled
}
EventChange
Change() // When releasing,
the current pointer value will
// be passed to the
DPE
{
dpSet($valve+".cmd.position",this.PointerValue);
}
EventSlide
Slide() // Each new value that
is created by dragging the
//pointer with the
mouse
{
InputSetpoint.text = this.PointerValue;
// will
be shown as a number in the
//text field
}
Consider
that you actually assigned the
name "InputSetpoint" to the combined input
and display field in the Figure
on the page "Input Dialog for the Reference" (Reference
value of the opening level). The above script can only then work
in the described form, for EventSlide.
NOTE
For
external ActiveX-Controls it is recommended to execute an additional
test to be able to evaluate the quality of the control
and the correct interplay better. Unfortunately, there
are controls with quite different level and sometimes insufficient
test coverage at the market
In order to set colors in ActiveX-Controls
or read them, special functions have to be used due to different
data formats. This also applies to the fonts. The
most important convert functions are OLEColor(),
PVSSColor(), OLEFont(), PVSSFont(). For more information, see
ActiveX
Functions. |